
No Bake Chocolate Oat Bars – The Ultimate Easy Dessert
Looking for a dessert that’s quick, easy, and irresistibly delicious? Meet the No Bake Chocolate Oat Bars – a perfect combination of chewy oats, rich chocolate, and creamy peanut butter, all layered into a treat that’s loved by kids and adults alike. Unlike traditional baked desserts, this recipe requires no oven, making it ideal for hot summer days, busy weekdays, or whenever you want a sweet snack without turning on the stove.
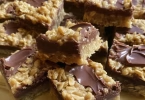
“Chewy, chocolatey, and absolutely irresistible – these oat bars are a dessert that everyone will love, no baking required!”
These bars are perfect for a variety of occasions – from casual afternoon snacks to crowd-pleasing treats at parties. With a balance of textures – a crunchy oat layer, a smooth chocolate peanut butter filling, and a slightly soft topping – each bite is a delightful experience.
Ingredients & Their Importance
- 1 cup butter: Acts as the base fat that binds the oats together and adds a rich, indulgent flavor that complements the chocolate.
- 1/2 cup packed brown sugar: Sweetens the bars naturally and gives a subtle caramel undertone that enhances the chocolate flavor.
- 1 teaspoon vanilla extract: Adds aromatic depth, enhancing both the chocolate and the oat layers.
- 3 cups quick cooking oats: Provides chewiness and structure. They’re essential for giving these bars a hearty texture that’s satisfying and filling.
- 1 cup semisweet chocolate chips: Creates a rich, gooey chocolate layer that contrasts beautifully with the oat base.
- 1/2 cup peanut butter: Introduces a creamy, nutty element that pairs perfectly with chocolate while adding flavor complexity and smoothness.
Step-by-Step Instructions
- Prepare the pan: Grease a 9×9 inch square pan thoroughly. This ensures your bars come out cleanly without sticking.
- Make the oat mixture: In a large saucepan, melt the butter over medium heat. Stir in the brown sugar and vanilla until fully combined. Add the oats and cook over low heat for 2-3 minutes, stirring constantly. This step allows the sugar to slightly melt into the butter and coat the oats, creating a cohesive mixture.
- Create the base layer: Press half of the oat mixture evenly into the bottom of your prepared pan. Use the back of a spoon or your fingers to press down gently but firmly, forming a solid foundation for the chocolate layer.
- Melt the chocolate and peanut butter: In a small heavy saucepan, melt the chocolate chips and peanut butter together over low heat. Stir frequently until smooth and creamy. This mixture should be thick but pourable.
- Assemble the chocolate layer: Pour the melted chocolate mixture evenly over the oat base. Use a spatula or knife to spread it carefully, ensuring full coverage.
- Add the topping: Crumble the remaining oat mixture evenly over the chocolate layer. Press gently so the topping sticks without mixing into the chocolate.
- Refrigerate to set: Cover the pan and refrigerate for 2-3 hours or overnight. This allows the chocolate and oats to firm up, making the bars easy to cut. Bring to room temperature before slicing into bars for the best texture.
Why This Recipe is Loved by Everyone
These No Bake Chocolate Oat Bars are adored for several reasons:
- Simplicity: No complicated steps, no baking required – anyone can make these bars in under 20 minutes.
- Flavor combination: The rich chocolate, creamy peanut butter, and hearty oats complement each other perfectly.
- Versatility: Ideal as a snack, dessert, or lunchbox treat.
- Make-ahead convenience: Can be stored in the fridge for several days, making them perfect for meal prep or party planning.
Pro Tips for Perfect No Bake Chocolate Oat Bars:
- Use quick cooking oats for a softer, chewier texture. Rolled oats will work but may yield a slightly firmer bar.
- Melt the chocolate and peanut butter over low heat to prevent scorching. Stir constantly for smooth consistency.
- Press the topping gently to avoid mixing it into the chocolate layer – this gives a distinct, layered look and texture.
- Experiment with adding chopped nuts, dried fruit, or a sprinkle of sea salt on top for added flavor and texture.
Serving Suggestions
These bars are versatile and can be served in multiple ways:
- Cut into squares or rectangles and enjoy with cold milk or coffee.
- Top with a scoop of vanilla ice cream for a decadent dessert.
- Pair with fresh fruits like berries or sliced bananas for a lighter snack.
- Wrap individually for lunchboxes, picnics, or snack packs.
Frequently Asked Questions (FAQ)
Final Thoughts
These No Bake Chocolate Oat Bars are more than just a dessert; they’re a testament to how simple ingredients can combine to create a treat that’s both indulgent and satisfying. With chewy oats, luscious chocolate, and creamy peanut butter, each bite is a delight. Perfect for any occasion, easy to make, and loved by all, these bars are sure to become a staple in your recipe collection.