Vanilla Custard Cream Squares
If you’re craving a dessert that feels both luxurious and nostalgic, these Vanilla Custard Cream Squares are your golden ticket.
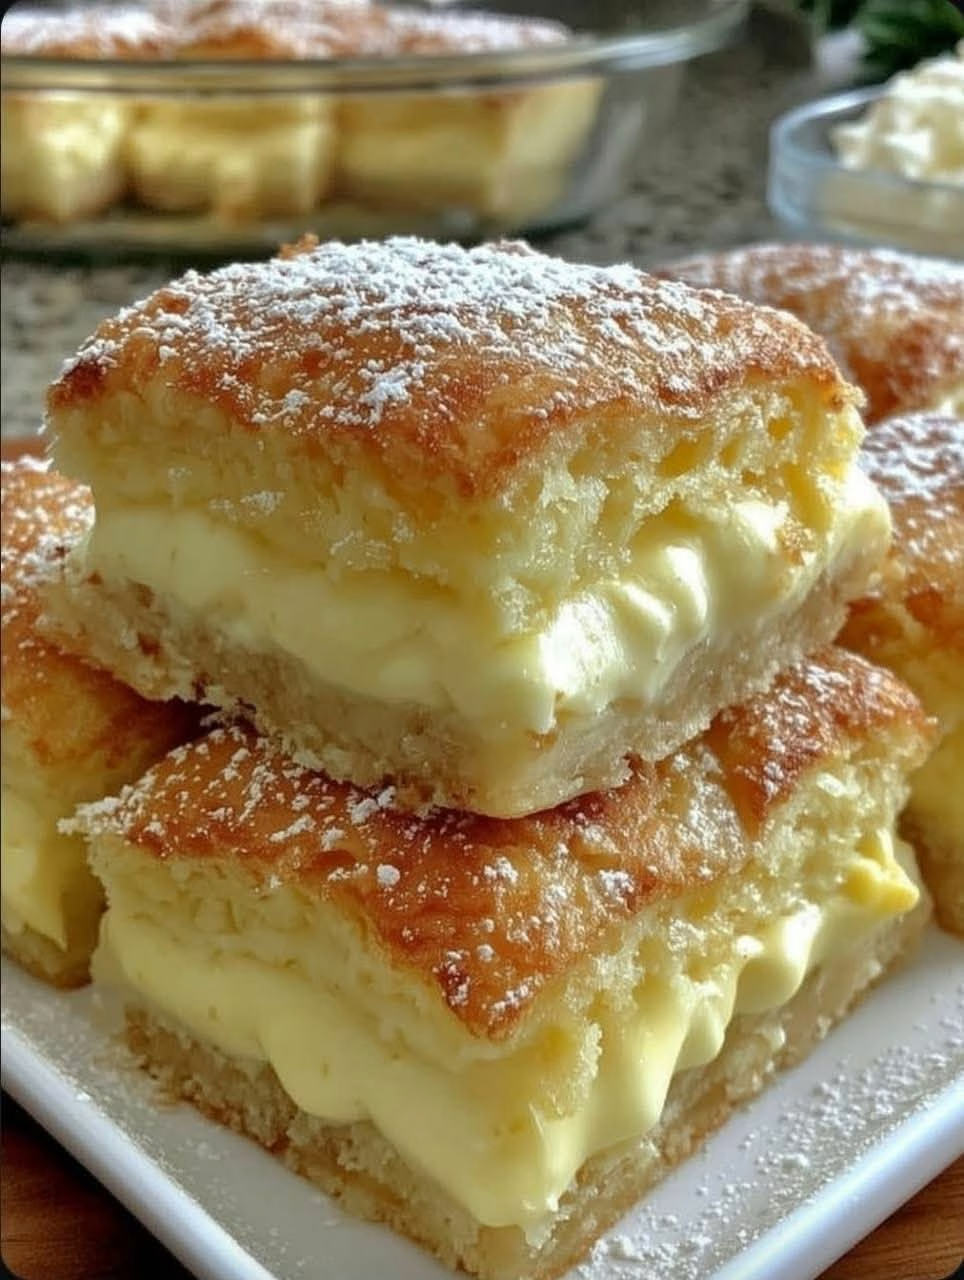
With delicate layers of flaky puff pastry hugging a thick, cloud-like vanilla custard, this elegant treat hits the sweet spot between indulgence and comfort.
Whether you’re entertaining or treating yourself on a weekday, this recipe promises to deliver both flavor and finesse.
Ingredients & Their Purpose
For the Pastry Layers:
- 2 sheets frozen puff pastry, thawed – Forms the light, crisp layers that frame the custard. Baking between trays ensures flat, even layers.
For the Vanilla Custard Filling:
- 4 cups whole milk – The creamy base of the custard; full-fat milk ensures richness.
- 1½ cups granulated sugar – Adds sweetness and helps stabilize the custard.
- 1¼ cups all-purpose flour – Thickens the custard without making it too gelatinous.
- 8 large eggs, separated – Yolks create a silky custard, while whites are not used in this recipe.
- 3 teaspoons vanilla extract – Delivers that classic warm vanilla flavor.
- 2 tablespoons dark rum (optional) – Adds a subtle depth and complexity.
- 2 cups heavy whipping cream, chilled – Whipped and folded into the custard for a light, airy texture.
- 2 tablespoons powdered sugar – Sweetens the whipped cream.
- Extra powdered sugar, for dusting – Adds a finished, bakery-style touch on top.
Step-by-Step Instructions
Step 1: Bake the Puff Pastry
- Preheat your oven to 400°F (200°C).
- Roll each puff pastry sheet to fit a 9×13-inch baking dish or sheet pan.
- Place each sheet between two pieces of parchment paper and sandwich with another tray to keep them flat while baking.
- Bake for 15–18 minutes or until golden and crisp. Let them cool completely.
- Once cooled, cut one sheet into squares — these will be your top layer.
Step 2: Make the Vanilla Custard
- In a large saucepan, whisk together egg yolks, sugar, and flour until smooth.
- Gradually add the milk while whisking constantly to avoid lumps.
- Cook over medium heat, stirring frequently, until the mixture thickens to a pudding-like consistency (about 10–12 minutes).
- Remove from heat and stir in the vanilla extract and rum (if using).
- Let cool to room temperature, stirring occasionally to prevent a skin from forming.
Step 3: Whip the Cream
- In a cold mixing bowl, whip the heavy cream with 2 tablespoons of powdered sugar until stiff peaks form.
- Gently fold the whipped cream into the cooled custard until fully combined and fluffy.
Step 4: Assemble the Squares
- Place the whole baked pastry sheet in the bottom of your dish or tray.
- Spread the custard mixture evenly over the pastry.
- Top with the pre-cut pastry squares.
- Refrigerate for at least 4 hours (overnight is best) to allow the custard to fully set.
- Dust with powdered sugar just before serving for a beautiful finish.
Serving Suggestions
These Vanilla Custard Cream Squares are perfect with:
- A cup of freshly brewed coffee or espresso for contrast.
- Fresh berries like raspberries or strawberries for added brightness.
- A drizzle of raspberry coulis or caramel sauce for elegance.
Why Everyone Loves This Dessert
- Elegant Presentation – These squares look like they came from a patisserie.
- Perfect Texture – Buttery, crisp pastry paired with velvety vanilla custard.
- Make-Ahead Friendly – Ideal for prepping the night before an event.
- Classic Flavor – A timeless taste that’s loved across generations.
Final Thoughts
Whether you’re serving guests or simply indulging in a sweet moment for yourself, these Vanilla Custard Cream Squares are everything you want in a dessert:
easy to make, beautifully layered, and melt-in-your-mouth delicious.
With just a handful of humble ingredients, you’ll create a showstopper that tastes like a dream.
Bookmark this recipe, because once you try it, you’ll be coming back again and again.