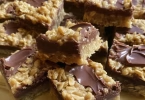
Chocolate Caramel Pretzel Bars — Easy & Irresistible!
Looking for a dessert that delivers everything at once — sweet, salty, crunchy, gooey, and chocolatey? These Chocolate Caramel Pretzel Bars are precisely that: a buttery, crunchy pretzel crust, a luscious caramel layer, and a glossy chocolate finish. They’re quick to assemble, travel beautifully, and disappear fast at parties. Read on for a complete, SEO-optimized recipe with ingredient roles, step-by-step instructions, pro tips, serving suggestions, and variations to make them your own.
Why You’ll Love This Recipe
These bars hit a perfect balance of textures and flavors. The **pretzel base** provides a salty crunch that contrasts the silky **caramel** layer, while the **chocolate topping** ties everything together with rich cocoa notes. They require pantry-friendly ingredients, minimal technique, and deliver professional-looking results every time.
Ingredients & Their Role
For the Pretzel Base
- 2 cups crushed pretzels — The salty, crunchy foundation. Crush to a coarse sand texture so the base binds but still gives crunch.
- ½ cup unsalted butter, melted — Binds the crushed pretzels and adds a rich, buttery mouthfeel to the crust.
- ¼ cup granulated sugar — Adds a touch of sweetness to balance the salt and intensifies browning during baking.
For the Caramel Layer
- 1 cup packed light brown sugar — The backbone of the caramel; brown sugar adds depth and a subtle molasses flavor.
- ½ cup unsalted butter — Creates a smooth, glossy texture and rounds the caramel’s flavor.
- ¼ cup heavy cream — Adds richness and silkiness so the caramel sets slightly soft, not rock-hard.
- ½ teaspoon vanilla extract — Enhances the caramel with warm, aromatic notes.
For the Chocolate Topping
- 1½ cups semi-sweet chocolate chips — Forms a glossy, slightly bitter counterpoint to the sweet caramel.
- ½ cup white chocolate chips (optional) — For decorative swirls or drizzles that add visual contrast and extra sweetness.
Step-by-Step Instructions
Step 1 — Prepare the Pretzel Base
- Preheat oven to 350°F (175°C). Line a 9×9-inch baking pan with parchment paper or lightly grease it for easy removal.
- In a medium bowl combine 2 cups crushed pretzels, ½ cup melted butter, and ¼ cup granulated sugar. Stir until evenly moistened.
- Press the mixture firmly into the prepared pan using the back of a spoon or a measuring cup — compacting the crust prevents crumbling later. Bake for 8–10 minutes until fragrant and slightly set. Let cool completely before adding the caramel.
Step 2 — Make the Caramel Layer
- In a medium saucepan over medium heat, melt ½ cup butter with 1 cup packed light brown sugar, stirring to combine.
- Once warm and combined, stir in ¼ cup heavy cream. Bring the mixture to a gentle simmer and let it bubble for 3–4 minutes, stirring frequently to prevent sticking or burning.
- Remove from heat and stir in ½ teaspoon vanilla extract. Pour the hot caramel evenly over the cooled pretzel crust and spread to the edges.
- Let the caramel rest for 15–20 minutes until it firms slightly but is still warm enough to accept the chocolate layer smoothly.
Step 3 — Add Chocolate Topping
- Place 1½ cups semi-sweet chocolate chips in a microwave-safe bowl. Heat in 30-second bursts, stirring after each burst, until smooth and glossy.
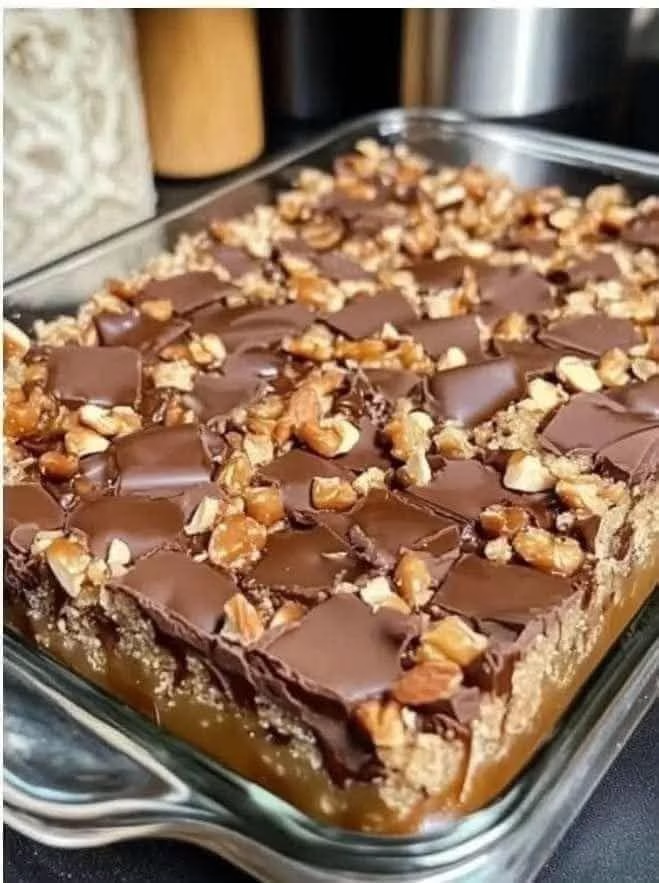
- Pour or spoon the melted chocolate over the caramel layer and spread to an even layer. If using white chocolate, melt and drizzle in a swirl pattern for a decorative finish — then use a toothpick to create marbled designs if desired.
- Chill the pan in the refrigerator for at least 1 hour, or until the chocolate is fully set and caramel is firm to the touch.
Step 4 — Slice & Serve
- Once fully chilled, lift the bars from the pan using the parchment overhang. Use a sharp knife warmed under hot water and dried between cuts for clean, glossy slices.
- Cut into 16 squares (or 9 large bars) and serve. Store leftovers in the fridge in an airtight container for up to 5 days.
Helpful Pro Tips
- Use a firm crust: Press the pretzel mixture very firmly into the pan before baking to create a stable base that doesn’t crumble when slicing.
- Control caramel texture: Simmer caramel just long enough (3–4 minutes) for a sliceable, slightly chewy set — longer boiling will yield firmer, harder caramel.
- Warm your knife: For glossy chocolate cuts, dip the knife in hot water and wipe dry between slices to avoid chipping the chocolate layer.
- Room temperature ingredients: Use room-temperature butter and cream for faster, more even caramel formation.
- Make ahead: These bars are perfect for prepping a day ahead — chilling overnight firms everything and improves sliceability.
Serving Suggestions & Pairings
These bars are incredibly versatile. Serve them as a sweet finish to a barbecue, on a holiday dessert table, or boxed as gifts. Pair with:
- A steaming cup of coffee or espresso — the bitterness complements the caramel and chocolate.
- Vanilla ice cream — place a warm bar over a scoop for a decadent dessert.
- A glass of milk or salted caramel latte — for those who love extra indulgence.
Variations & Substitutions
- Nutty crunch: Sprinkle chopped toasted pecans or almonds over the caramel before adding chocolate.
- Salted caramel: Add a pinch of flaky sea salt on top of the chocolate for a trendy salted-caramel twist.
- Gluten-free: Use certified gluten-free pretzels and gluten-free baking practices.
- Spiced caramel: Stir ¼ teaspoon cinnamon or a pinch of ground ginger into the caramel for warm spice notes.